
Searching:
0 results found Back
BackAdding a Rule
In order to add a rule, do ad follows:
- In the left pane of the Axonize Portal, click the
 button. The following window displays:
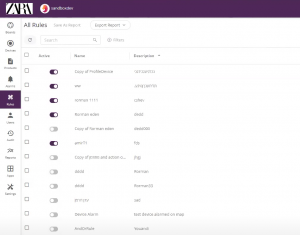
This window displays the Rule, list of rules currently defined in the system.
- Scroll down to the bottom of the rule list and click the
 button. The following window displays:

This window contains four tabs; General, Time, Conditions and Actions.
- In the following window, fill in the fields below, which specify general characteristics of the Rule:
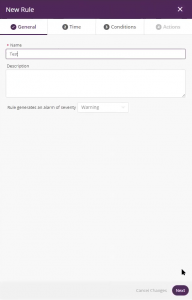
Note ‒ An asterisk (*) indicates a mandatory field.
- Name – A free-text field specifying the name of the Rule.
- Description – A free-text field providing a description of the Rule.
- Rule generates an alarm of severity – Check the checkbox for the Rule to generate an Alarm of a particular severity. In the adjacent drop down list, select the applicable Alarm severity.

- Click the Next button to move to the Time tab in the window or simply click the Time tab:
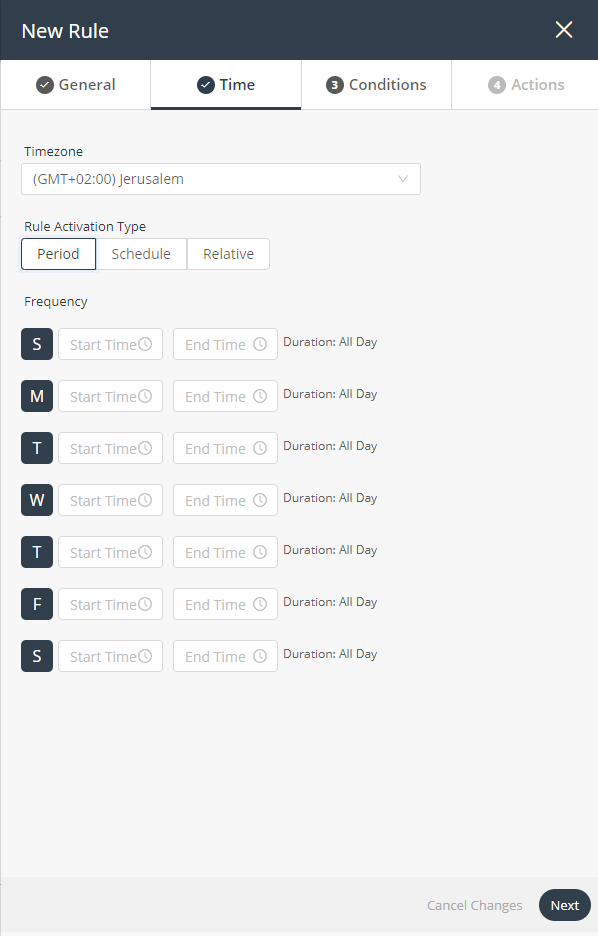
In this tab, you specify when the Rule is to be activated, and whether it is activated for a specific time period, or based on a defined schedule. By default, a Rule is activated all day, every day.
Specify the following to define when the Rule is to be active:
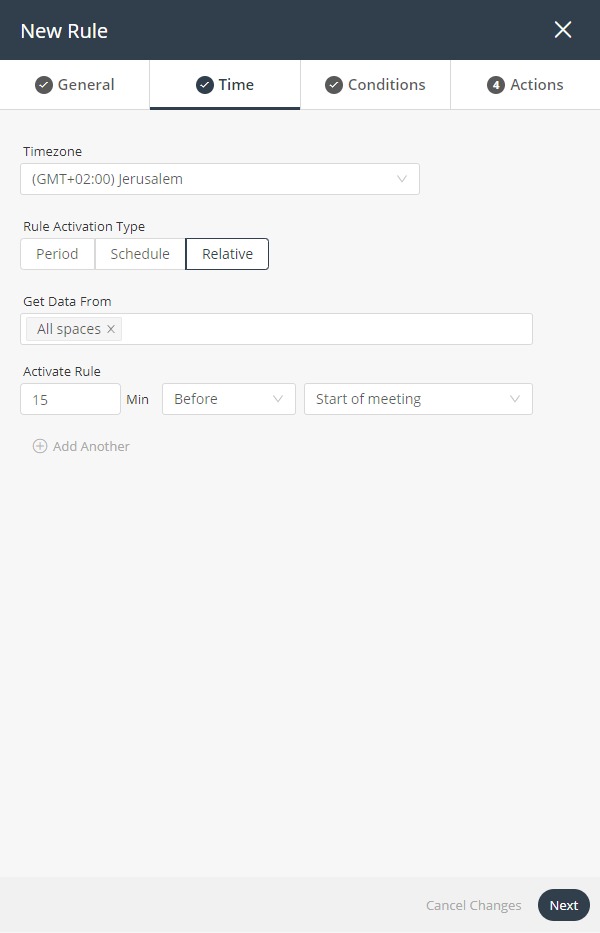
- Timezone – Specify the timezone that applies to the Rule.
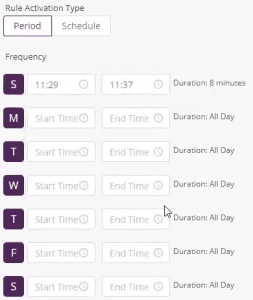
- Rule Activation Type – This field determines whether the Rule is activated for a specific time period or based on a schedule, as follows:
- Period – Specifies the time period when the Rule is active. The condition(s) of a Periodic Rule are only checked during the particular days and times that you specify. If they are met, then the action defined for the Rule is triggered. For this type of Rule, each time an event arrives within the defined time period that crosses the threshold specified in the Rule’s condition, the Rule is activated.
- Schedule – For a Scheduled Rule, you specify the frequency, day(s) and exact time when the Rule’s condition(s) are checked. If the conditions are met at this exact time, then the Rule action is triggered.
Setting this rule to be active Daily, Weekly or Monthly, means that the condition(s) is checked Daily, Weekly or Monthly.
You can add additional times when the Rule is meant to be active by clicking the + Add Another link, and then specifying the time in the new Set Time row.
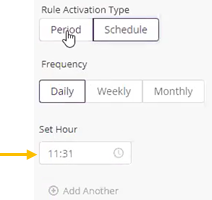
Daily:
In the example below, the condition(s) are checked once a day at 11:31.
Weekly:
In the example below, the condition(s) are checked on Sundays and Tuesdays at 11:31, 11:38 and 11:36.

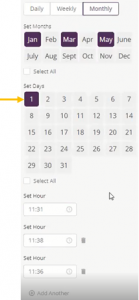
Monthly:
In the example below, the condition(s) are checked on the first of the month for January, March and May at 11:31, 11:38 and 11:36.
-
-
- Relative – For a Relative Rule, you can specify the calendar device and time before or after the meeting to schedule.
-
-
-
- Get Data From – Specify the calendar device, and the rule apply to (All the meetings will be taken from the device calendar).
- Activate Rule – Specify when to run the rule. You can trigger the rule X minutes before or after meeting (Apply for all the meetings).
-
-
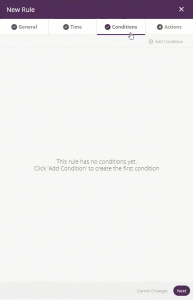
- Click the Next button to move to the Conditions tab in the window or simply click the Conditions tab:
-
-
- Click the
 button. The following window displays:
- Click the
-
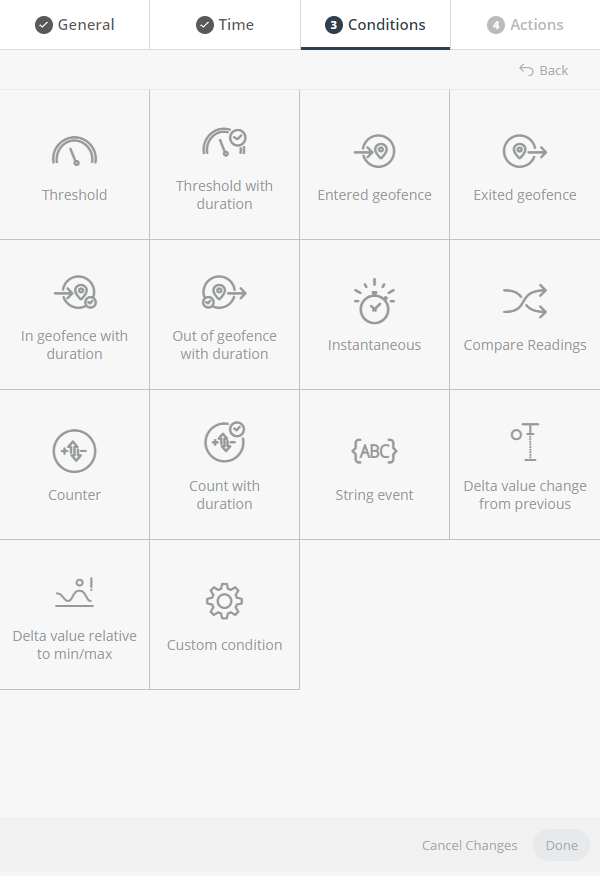
This window contains several boxes. Each box represents a different type of condition that can be defined for a Rule. The following condition types can be defined:
-
-
- Threshold – The Device reading is different than a specific reading.
- Threshold with Duration – The Device reading is different than a specific value for a defined amount of time.
- Entered Geofence – The Device entered a predefined geolocation.
- Exited Geofence – The Device exited a predefined geolocation.
- In Geofence with Duration – The Device entered a predefined geolocation for a defined amount of time.
- Out of Geofence with Duration – The Device exited a predefined geolocation for a defined amount of time.
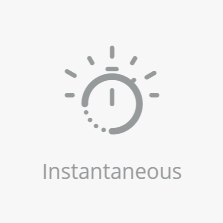
- Instantaneous – An event type reading, (or instantaneous) reading occurred.
- Compare Readings – Compare two different readings values from the same or two different devices.
-
Some Conditions are standalone Conditions and cannot be used with additional conditions, these include:
-
-
-
- Conditions that target multiple things (app/product/group template/multiple devices/multiple digital twins) can not be combined with other conditions.
- Can not have multiple duration conditions ( can have one duration and one non duration condition)
- Compare readings condition can not be combined with other conditions
-
-
All condition types are defined in a similar manner. Click a box in the window to define that type of condition. For example purposes, the following describes how to define a Threshold condition type.

-
-
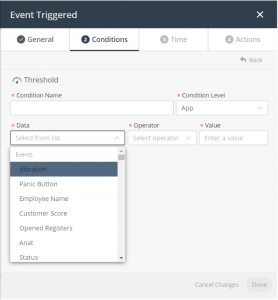
- Threshold – For this type of condition, set the following properties:
-
Note ‒ An asterisk (*) indicates a mandatory field.
- Condition Name – Specifies a name for the condition.
- Condition Level – Specifies the type of entity on which the Rule’s action is to be performed such as; an Application, Device or Product. Note that some condition types only apply to specific entities. For more details.
Note ‒ The Condition Level for the Threshold with Duration, In Geofence with Duration and Out of Geofence with Duration condition types can be set for the Application, Device and Product levels, as shown below:
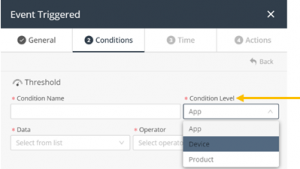
The Condition Level for the Threshold with Duration, In Geofence with Duration and Out of Geofence with Duration condition types can also be set for multiple devices simultaneously.
-
-
- Devices – Specifies the Device(s) on which to apply the condition.
-
![]()
-
-
- Data – Specifies the property or Event identifier (Event Name plus Type Code) that triggers the Rule. The properties in the dropdown list vary, depending on the Condition Level selected (see above). For example, if the Condition Level is Application, then only properties of an Application display.
-
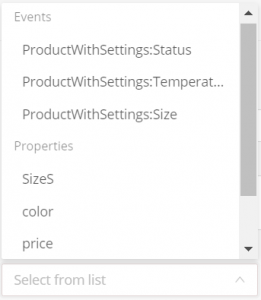
The Events in the drop down list specify the name of the Event for the Application ID/Product/Device on which to apply the condition. Axonize works on a combination of the Event Name and Type Code to uniquely identify an Event.
Note ‒ Product properties correspond to additional Properties in the Products API endpoints.
-
-
- Operator – Specifies the operator to apply to the data selected in the Data The options that display in the drop down list vary, depending on the data selected in the Data field.
-

-
-
- Value – Specifies the value that triggers the condition.
-

After specifying all required fields for the condition, click the Done button. The condition displays in the list of conditions in the Conditions tab.
You can add multiple conditions in a Rule. In such cases, there is an OR relationship between the conditions.
For example purposes, the following describes how to define an Instantaneous condition type:
-
-
- Instantaneous – For this type of condition, set the following properties:
-
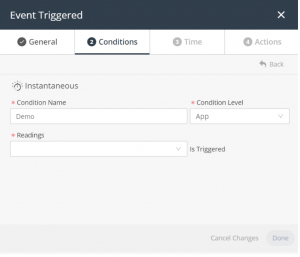
Note ‒ An asterisk (*) indicates a mandatory field.
-
-
- Condition Name – Specifies a name for the condition.
- Condition Level – Specifies the type of entity on which the Rule’s action is to be performed, such as an Application, Device or Product.
- Readings – Specifies the reading that triggers the event.
-
After specifying all required fields for the condition, click the Done button. The condition displays in the list of conditions in the Conditions tab.
-
-
- Compare Readings – For this type of condition, set the following properties:
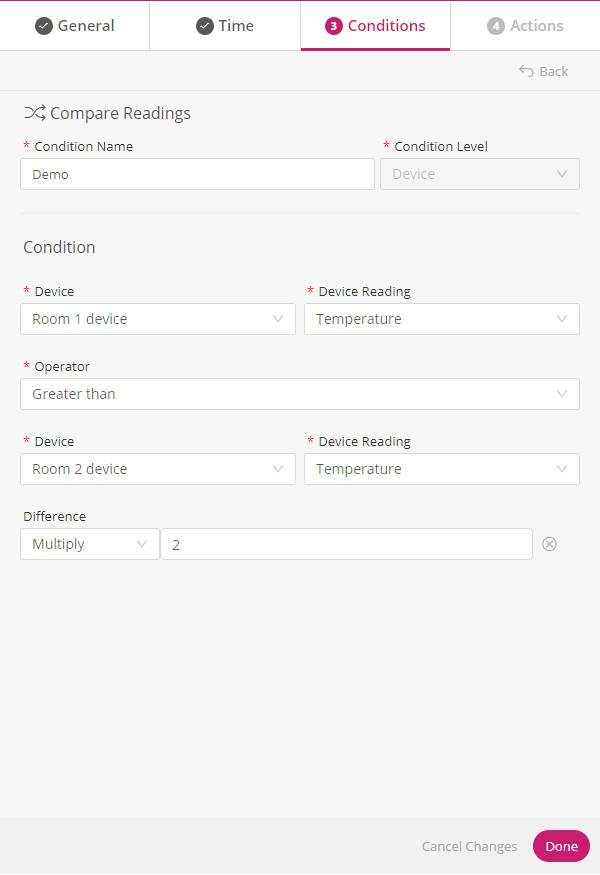
Note ‒ An asterisk (*) indicates a mandatory field.
-
-
-
- Condition Name – Specifies a name for the condition.
- Device – Specifies the device to apply the condition.
- Device Reading – Specifies the device reading for the condition.
- Operator – Specifies the operator to apply to the data selected.
- Difference – Add operation for the second device reading value , (ie. Difference Multiply 2 will be equal to Temperature from room 1 is greater than twice the temperature in room 2).
-
-
After specifying all required fields for the condition, click the Done button. The condition displays in the list of conditions in the Conditions tab.
-
-
- Click the Next button to move to the Actions tab in the window or simply click the Actions tab:
-
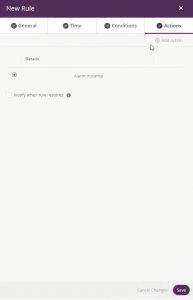
In this tab, you define the action to be performed once the Rule condition has been met.
-
-
- Click the
 button. The following displays:
- Click the
-
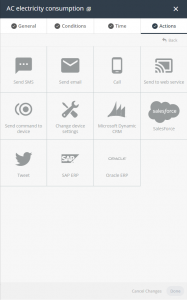
This window contains several boxes. Each box represents a different type of action that can be defined for a Rule.
All action types are defined in a similar manner. Click a box in the window to define that type of action.
The following types of actions can be defined:
-
-
- Send SMS
-
-
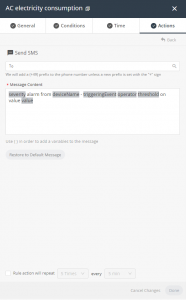
For this action type, set the following properties:
-
-
- To – Specifies the recipient(s) to receive the SMS. The recipient(s) can be selected from the Application users, or by adding a specific phone number/address.
- Message Content – Specifies the content of the SMS message to be sent. The system automatically populates the keywords and the message content according to the Rule you have defined. You can manually add text and keywords, or edit the message, as needed. Alternatively, you can select from the available keywords in the system by typing a curly bracket ({ ), and then selecting a relevant keyword in the drop down menu that displays, as shown below:
-
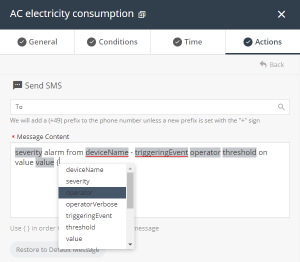
Axonize keywords can be included in the message inside brackets {}. These keywords enable you to include information retrieved by Axonize in the message.
-
- Restore to Default Message – Click this button to restore the Message Content to its default message.
- Rule action will repeat – Specifies the number of times to repeat the Rule action and the interval between repetitions.
- Rule Description – Provides a free-text description of the Rule.
- Send Email
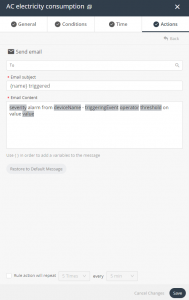
The properties that you define for this action type are the same as those for the Send SMS action type.
-
-
- Call
-
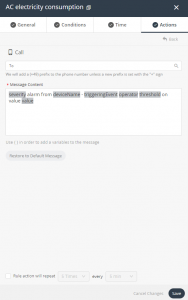
The properties that you define for this action type are the same as those for the Send SMS action type.
-
-
- Send to Web Service
-
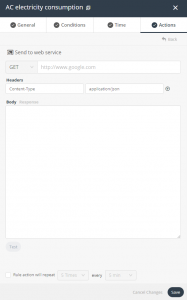
The Axonize web service can link to any endpoint system as a result of a rule action. The web service is sent from a closed group of static IPs to ensure proper integration with the system that requires an IP white list.
The static IPs used vary, depending on the environment. When developing in the Staging environment, one of the following IPs is used – 52.166.49.187, 40.114.142.65, 40.115.40.56 or 168.63.100.144. When developing in the Production environment, one of the following IPs is used – 40.115.24.132, 104.40.177.115, 40.68.148.115, 40.115.46.91, 40.118.80.207 or 168.63.100.144.
For this action type, set the following properties:
-
-
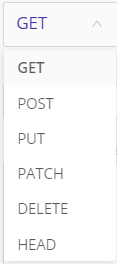
- Method – Specifies the method of the web service, such as POST, GET, etc.
-
-
-
- URL – Specifies the URL to which to send the call.
- Headers – Click the plus + button to add the key and value properties of the header. These are the key/values that are sent as HTTP headers. The key becomes the header key and the value becomes the header value.
-

-
-
- Body – Specifies the body of the HTTP call. You can click the Test button after filling in this field to perform a live test.
- Response – Specifies the response received to the HTTP call. You can view the response after doing a live test (see above).
- Rule Description – Free text describing the Rule.
-
-
- Send Command to Device

For this action type, set the following properties:
-
-
- Devices – Specifies the Device to which to send the command.
- Commands – Specifies the command to send to the Device.
- Rule actions will repeat – Specifies the number of times to repeat the Rule action and the interval between repetitions.
- Rule Description – Provides a free-text description of the Rule.
- Change Device Settings
-
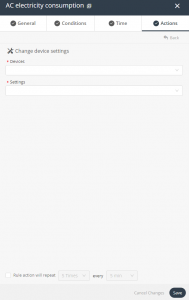
For this action type, set the following properties:
-
-
-
- Devices – Specifies the Device whose settings are to be changed.
- Settings – Specifies the setting to change on the Device.
- Value – Specifies the new value to assign to the setting on the Device. You can add “+,-,*,/” so that the property will increment by.
-
-
Note ‒ All other action types are not currently supported.
-
- After specifying all required fields for the action, click the Save. The Rule is then added to the rule list.