
Searching:
0 results found Back
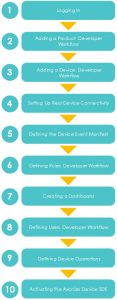
BackCreating an Application – Developer Workflow
The following describes the workflow for a developer of an Axonize Application.
Axonize Prerequisites
- Developers ‒ Before reading this, make sure that you are familiar with “How Does Axonize Work?”, especially, the following Axonize entities:
- Axonize REST API
- Axonize Device SDK
- Axonize Server
- Axonize Manifests
An Axonize Application developer is assumed to be familiar with Axonize concepts, the Axonize Portal and with general API usability concepts.
- Devices ‒ Axonize can receive events from both Real Devices and Virtual
- Real Devices – Must be connected to the Internet.
- Virtual Devices – A Virtual Device Manifest must be defined as described in “Defining a Virtual Device Manifest,” and placed on the Axonize Server. This manifest defines the properties, operations and events of each Virtual Device.
- Axonize Device SDK ‒ The Device must have one of the Axonize supported runtime environments installed on it – Node.js (Version 6 and above), C, C#, Python and Java runtime environments.
Step 1, Logging In
Contact Axonize to set up an account for you and then we will send you the credentials you need to log in.
These credentials include the user name and password for logging into the Axonize Portal, the Axonize Portal URL and the Client ID and Client Secret properties that are required for each request to the Axonize REST API.
This Client ID and Client Secret enable access to the Master Application assigned to this user. The user can then create additional Applications.
See the Login API endpoint for more information.
Step 2, Adding a Product – Developer Workflow
A Product is a type of Device, and serves as a way of grouping Devices. See Products for a description of what a Product is.
To add a Product:
- Use the Axonize REST API to create a Product, as described below in Adding a Product Using the Axonize REST API.
- Define a Product Manifest, which defines the metadata that is assigned for each Device, (both a Real and Virtual Device) that belongs to the same Product. For example, all the properties of the same type of heat sensor model. See Defining a Product Manifest for more details. The Axonize Portal enables you to place the Product Manifest on the Axonize Server.
Adding a Product Using the Axonize REST API
To add a Product using the Axonize REST API –
- Use the Axonize REST API Products/Post endpoint. To see a description of the APIs, access ‒
https://api.axonize.com/swagger/ui/index - A list of the Axonize entities is displayed, as shown below:
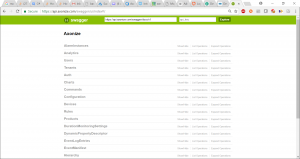
- Expand the Product entity to see the actions that the API provides for Products and then expand the Products/Post endpoint to see its details.
- Fill in the Products/POST Name is the only mandatory property. For more details about the properties of the Product, see Products/Post.
-
- name (string) ‒ Specify any free-text name for the Product, which will be shown in the Axonize Portal.
*Note ‒ Each request to the Axonize REST API requires the Client ID and Client Secret properties that are provided by Axonize when you create an account, or an Authorization token created from a login request.
- The response to the Products/Post provides a unique Product ID.
- Define a Product Manifest, which defines the metadata that is assigned for each Device, (both a Real and Virtual Device,) that belongs to the same Product. For example, all the properties of the same type of heat sensor model. See Defining a Product Manifest for more details. The Axonize Portal enables you to place the Product Manifest on the Axonize Server.
Step 3, Adding a Device ‒ Developer Workflow
A Device can be added either in the Axonize Portal (as described in Step 3, Add a Device or using the API, as described below.
To a add a Device using the Axonize REST API:
- Use the Axonize REST API Devices/Post endpoint. To see a description of the APIs, access –
https://api.axonize.com/swagger/ui/index. - Expand the Devices/Products/Post endpoint to see its details.
For example ‒
HTTP –
POST /odata/devices HTTP/1.1
Host:api.stg.axonize.com
Content-Type: Application/json
Cache-Control: no-cache
clientId: [enter your Client Id]
clientSecret: [enter your Client Secret]
{“name”:”[the device name]”,”ProductId”:”[enter your Product Id]”}
Curl –
curl -X POST -H “Content-Type: Application/json” -H “clientId: [enter your Client Id]” -H “clientSecret: [enter your Client Secret]” -H “Cache-Control: no-cache” -d ‘{“name”:”[the device name]”,”ProductId”:”[enter your Product Id]”}’ https://api.stg.axonize.com/odata/devices
- Fill in the Devices/Post properties. The following describes the mandatory properties. For more details, see Devices/Post:
-
- name (string) ‒ Specify any free-text name for the Device, which is shown in the Axonize Portal.
- ProductId (string) ‒ Specify the Product ID (Device type) of this Device. This string was received as a response to the Products/Post endpoint.
- The response to the Devices/Post provides the unique access credentials that enable the Device to connect to the Axonize server. These access credentials must be loaded onto the Device, as described in the next steps below.
Step 4, Setting Up Real Device Connectivity
The following describes how to set up the Axonize Device SDK on a Real Device so that it can send events to the Axonize Server and listen for endpoints from it.
Installing the Axonize Device SDK on the Device
Install the Axonize Device SDK on the Device by copying the provided Axonize Device SDK files anywhere on the Device.
Axonize REST API ‒ Placing the Device’s Unique Identifier on the Device
Axonize provides two methods for getting the unique access credentials that enable a Device to access the Axonize Server:
Getting Device Access Credentials – Portal
To get access credentials –
- Click the Devices button in the left pane to display a list of Devices.
- Click the row of one of the Devices, and then click the Properties tab.
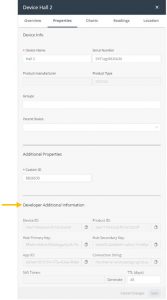
- Copy the values in the fields in the Developer Additional Information area of this window (as described in Device Access Credentials) in the Axonize SDK config file to enable the device to access the Axonize Server.
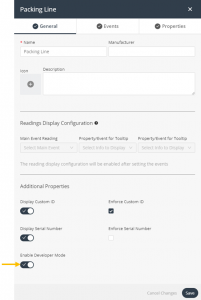
Note ‒ In order to access these fields, the Enable Developer Mode property must be True in the Device’s Product definition. To set this value, click the Products button, and in the General tab, set the Enable Developer Mode field to on, as shown below:
Getting Device Access Credentials – API
When the Device was created (using Devices/Post), the response provided the unique access credentials that enable the Device to access the Axonize Server. These access credentials must be loaded onto the Device, as described below.
Open the config file on the Device and fill in the following properties. The config file was installed with the Axonize Device SDK.
Device Access Credentials
The following four fields are the access credentials that enable a device to access the Axonize Server. You can get these fields either from the Axonize Portal or the Axonize REST API, as described above –
- DeviceId – Enter the id value received in the Devices/Post This is the unique identifier of the Device in the Axonize system.
- ProductId – Enter the ProductId value received in the Devices/Post This is the unique identifier of the Product in the Axonize system.
- appId – Enter the appId value received in the Devices/Post This is the unique identifier of the Application in Axonize to which this Device belongs.
- HubKey – Enter the hubPrimaryKey from the Devices/Post These are the unique access credentials for each Device provided by Axonize.
Step 5, Defining the Device Event Manifest
Create a Device Event Manifest, which defines the type of events that the Axonize Device SDK sends from the Device to the Axonize Server. See Defining a Device Event Manifest for more information.
Step 6, Defining Rules – Developer Workflow
Rules can be defined either using the Axonize Portal (see Step 4, Defining Rules) or using the Axonize REST API, as described below.
To define a Rule using the Axonize REST API:
- Use the Axonize REST API Rules/Post request.
Step 7, Creating a Dashboard
See Step 5, Creating a Dashboard.
Step 8, Defining Users – Developer Workflow
Users can be defined either using the Axonize Portal (see Step 6, Defining Users) or using the Axonize REST API, as described below.
Note ‒ These users are automatically activated (in contrast to users created in the Axonize Portal).
To define an Axonize user using the Axonize REST API:
- Use the Axonize REST API Users/Post request.
Step 9, Defining Device Operations
The Axonize REST sendCommand endpoint can be used to send an endpoint to a Device that activates operations on the Device. These endpoints contain free text that represents the method to be executed on the Device.
The Axonize Device SDK endpoint hubClient.receive on the Device listens for the arrival of this endpoint and then executes this free text in order to activate the relevant operation on the Device.
Alternatively, Axonize can set up its endpoint gateway that can send endpoints to Devices that are not using the Axonize Device SDK.
Step 10, Activating the Axonize Device SDK
Make sure that Node.js is installed on the Device.
On the Device, activate the Axonize Device SDK by running –
- npm install
- node app.js
The Device starts sending events to the Axonize Server and listening for commands from it.
See below:
- Axonize Device SDK ‒ Sending Events to Axonize Server
- Axonize Device SDK ‒ Receiving an Endpoint from the Axonize API
Axonize Device SDK ‒ Sending Events to Axonize Server
In order to send the correct event, you must update the payload in app.js in the Axonize Device SDK and use the sendEventToHub endpoint. See sendEventToHub for more details.
Fill in the following mandatory properties of the payload:
- type – The event type. See Defining a Device Event Manifest. Axonize provides a list of the event types for your selection, such as temperature, humidity, acceleration, pressure and so on.
- name – The event name to be shown in the Axonize Portal.
- value – The value of the reading on the Device to be shown in the Axonize Portal.
The following shows an example of how a new incoming event appears in the Axonize Dashboard.
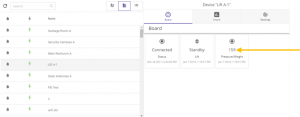
The left side of this window shows a list of Devices. When you click a Device in this list, the right side of this window shows the most recent readings received by Axonize from the Device. The Dashboards only show the most recent readings by overwriting previously received readings.
Axonize Device SDK ‒ Receiving an Endpoint from the Axonize API
The Axonize Device SDK endpoint hubClient.receive listens for incoming endpoints sent by the Axonize API. See hubClient.receive for more details.
To send endpoints to the Axonize Device SDK from the Axonize REST API, use the sendCommand endpoint.
In the message value sent to the Device by this endpoint, you can enter any free text. This free text should act as a trigger to the Device, so that the Device activates an operation, such as to open a lock, turn on a light and so on.
The developer must program the Device to use this message value in order to activate the relevant operation when the relevant free text is received.
The following shows an example of sending the word turn on to the Axonize Device SDK.
HTTP –
POST odata/devices/[your device id]/SendCommand HTTP/1.1
Host: stg.api.axonize.com
Content-Type: Application/json
Cache-Control: no-cache
clientId: [enter your Client Id]
clientSecret: [enter your Client Secret]
{“Message”:”turn on“}
Curl –
curl -X POST -H “Content-Type: Application/json” -H “clientId: [enter your Client Id]” -H “clientSecret: [enter your Client Secret]” -H “Cache-Control: no-cache” -d ‘{“Message”:”testing”}’ https://api.stg.axonize.com/odata/devices/[your Device Id] /SendCommand